 Sign in
Podio
How to integrate Podio with Plecto
-
Go to Data sources > New data source > Podio.
-
Click Next and log in to your Podio account.
-
Click Grant access to give Plecto read access to your data.
-
Select a workspace you want to import data from.
-
Select the data you want to import.
-
Configure your data source settings. Here, you can change the title, choose the default date, select which fields to import, and more.
-
Click Next to choose how much data to import and how long you want to keep it in the data source.
-
Click Import to finish.
How to import data from a related app in Podio
You can import data to Plecto that comes from a related Podio application. For example, you might have a related field called Account reference in your Leads app.
If you want to import the account references together with leads in Plecto, you have to add a calculation field to your Podio app template. Calculation fields allow you to do calculations and link the values from different fields.
Find more info in Podio's guide on Calculations.
Follow the steps below to get data from a calculation field from Podio into Plecto.
Step 1: Create a Calculation field in Podio
-
Log in to your Podio account.
-
Open a workspace and click on the Projects icon in the upper-left side of the screen. Podio will open all the projects in this workspace.
-
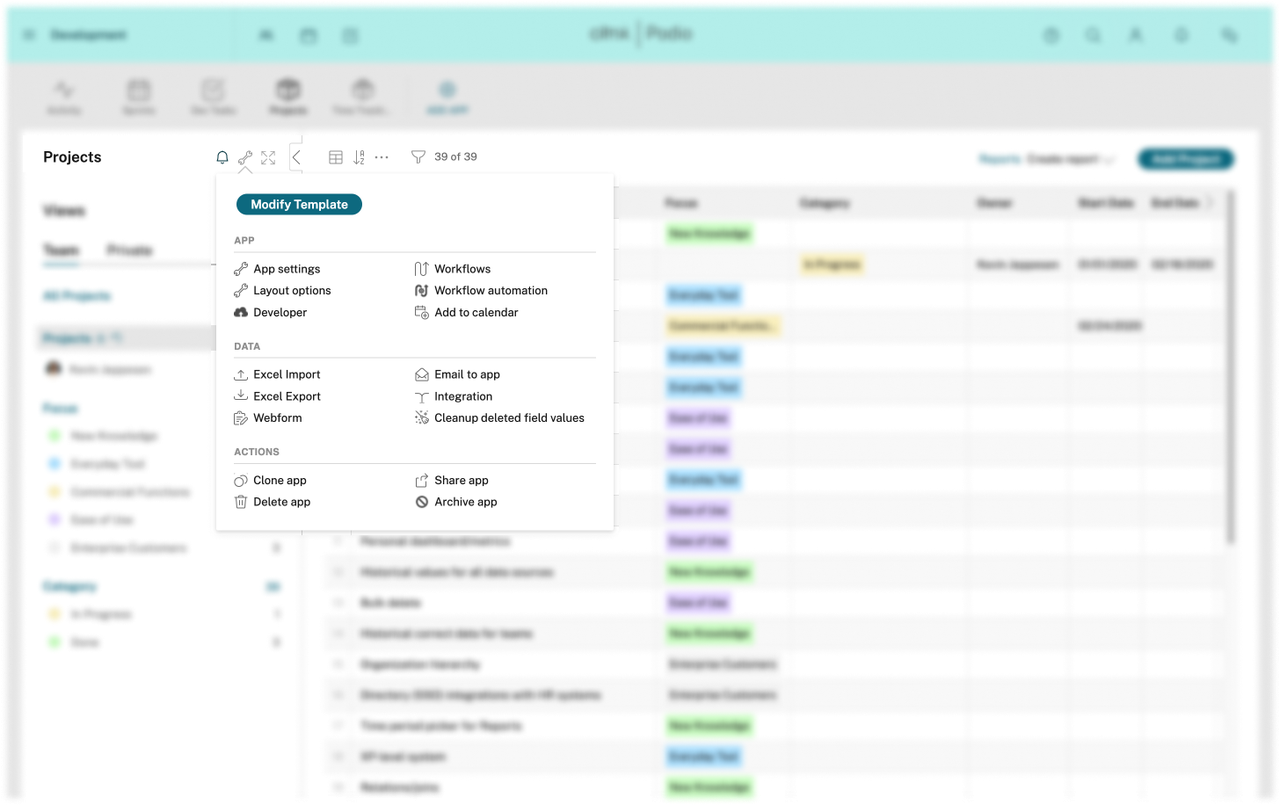
Click on the wrench icon next to Projects, then click Modify Template.
-
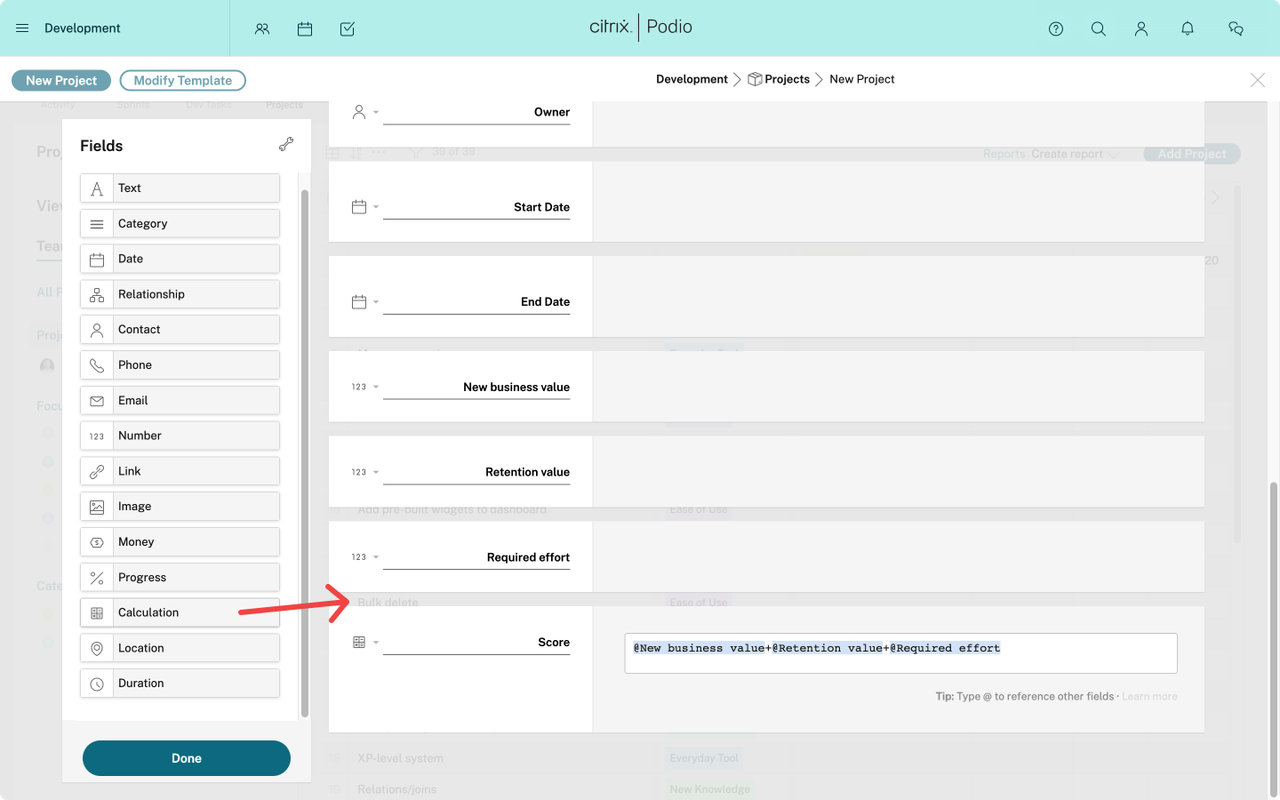
In the Fields list on the left, select Calculation and drag it to the right side of the screen.
-
Type @ and select fields from your related apps. Here's an example of a calculation:
@ValueA + @ValueB. If the related field is text, use the following workaround:@[Company reference] + " ". Otherwise, Plecto will import your related field values as decimal numbers. -
Click Done.
Calculation field workaround for related fields
By default, Plecto imports your related items as a decimal numbers. You can create a workaround to see your app references (for example, account reference, company name) by adding a + " " to the item in the calculation field in Podio.
For example, @Company name + " ". This will ensure that Plecto shows text in this field in your data source.
Step 2: Update your data source fields
-
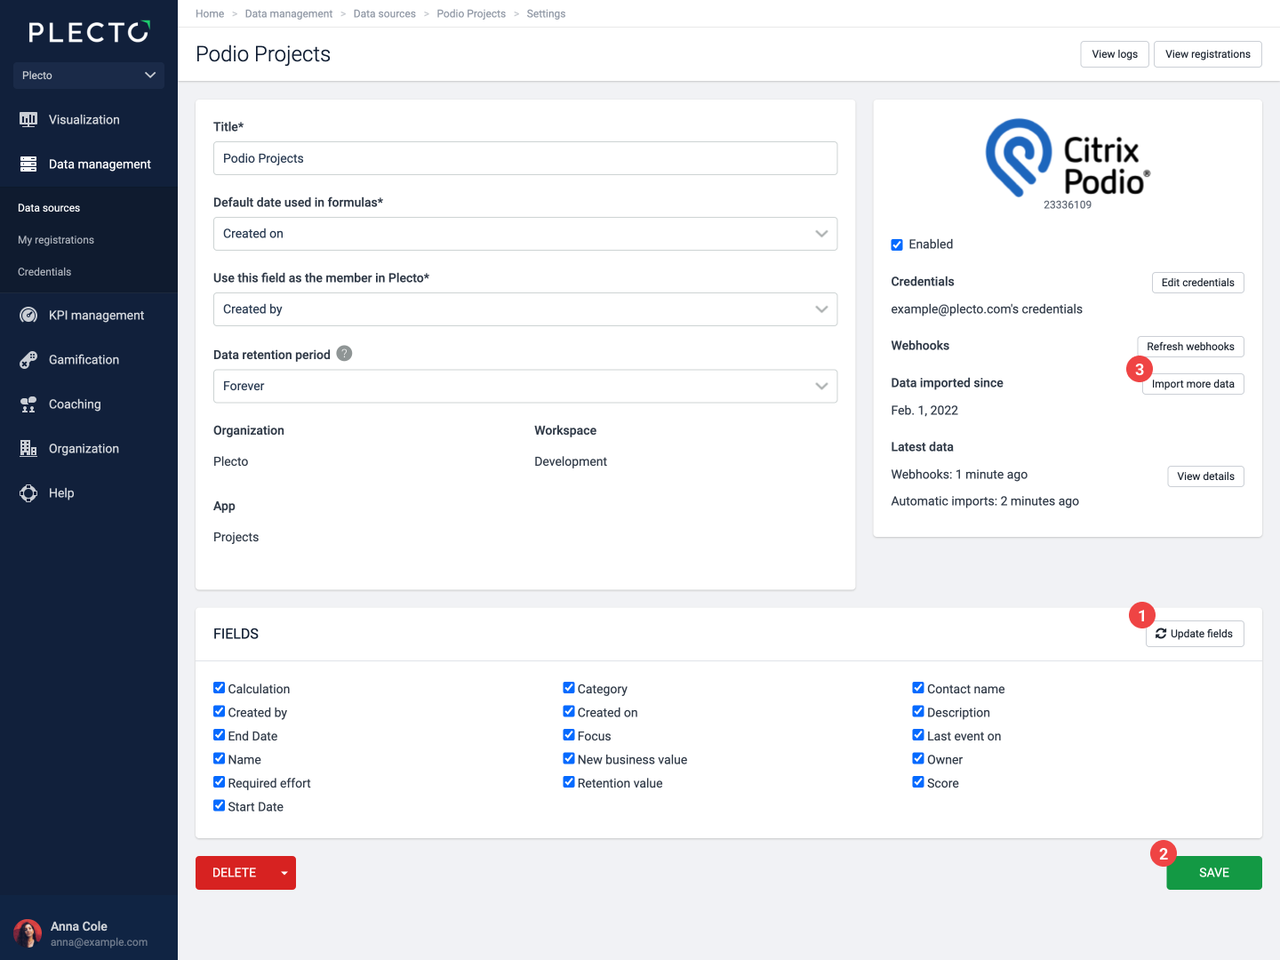
Go to Data sources and open your Podio data source settings.
-
Click Update fields.
-
Find the new field names (all the fields you added to Calculation in Podio) and select them so that you see a blue checkbox next to the field name.
-
Click Save.
-
Finally, click Import more data and choose a date from when Plecto should import your data. This will ensure that there's data in your newly added fields.
Updating Calculation fields. Due to the way Podio handles the Calculation field type, the field (and the added variables) won't update automatically in Plecto. To solve this, you can have a different field (not Calculation) update in Podio whenever the Calculation field is updated, which will trigger the update in Plecto.
How to see your employees/contacts in Plecto
Each line in your data source in Plecto represents an activity, which must be linked to an employee.
This is why there must always be a contact field in your Podio app, where you choose which employee should be assigned to each activity.
Step 1: Add a contact/member field in Podio
-
Open a workspace and click on the Projects icon.
-
Click on the wrench icon next to Projects, then click Modify Template.
-
Choose the Contact field and add it to your app by dragging it to the right side.
-
Click Done. Now you can assign each of your employees to an activity in Podio.
Step 2: Add the Contact field as the employee in Plecto
-
Go to Data sources and open your Podio data source settings.
-
Find the field Use this field as the member in Plecto and choose Contact. If you renamed the field in Podio, choose the option that matches that field.
-
Click Save in the bottom-right corner.
-
Click Import more data to run a manual import. This will make sure all the historical data gets updated in your data source.
Available data
Our integration with Podio works differently than our integrations with other systems. Since you can create many different apps in Podio, there are no limitations – we integrate with everything. The data you can import depends on your apps in Podio.
Visit our Podio integration page for technical details, such as the update frequency, custom field support, automatic data deletion, and more.
Single and multi-line fields
You can choose multiple options in one field in Podio. If you import a multi-line field, you will most likely see something like <p> and </p> in your Plecto data source because Plecto can only import one item per registration.
To remove these, change the field type in Podio to single line. You can change the field settings when modifying an app template in Podio.
"Podio Deleted User" shows up as employee in Plecto
If you see Podio Deleted User in the employee field in your Plecto data source, it means that nobody is assigned to the activity in your Podio app – the Contact field in your Podio item is empty.
To see the employee names in Plecto, open your Podio workspace and add the missing employees to the Contact field on all items that don't have an employee. Once all employees are added, they will automatically get updated in Plecto.
Tip – Set the Contact field as a required field
Make the Contact field a required field in Podio so that it always gets filled out. To set a field as required, open the Modify Template settings, click on the field icon in the template, then select Required field.
There you can also add other options, such as Hidden if empty, Always hidden, add help text, and more.