 Sign in
Relatel
Step 1: Find an access token in Relatel
-
Log into your Relatel account.
-
Go to Min profil by clicking your name in the top-right corner.
-
Choose Applikationer from the menu.
-
Click on the Generer access token button.
-
Save the credentials. You will have to use them in Step 2.
All these steps need to be repeated for each employee that you want call data for.
Step 2: Integrate Relatel with Plecto
-
In Plecto, go to Data sources > New data source > Relatel.
-
(Optional) Rename your credentials.
-
Insert the access token you generated in Relatel and click Next.
-
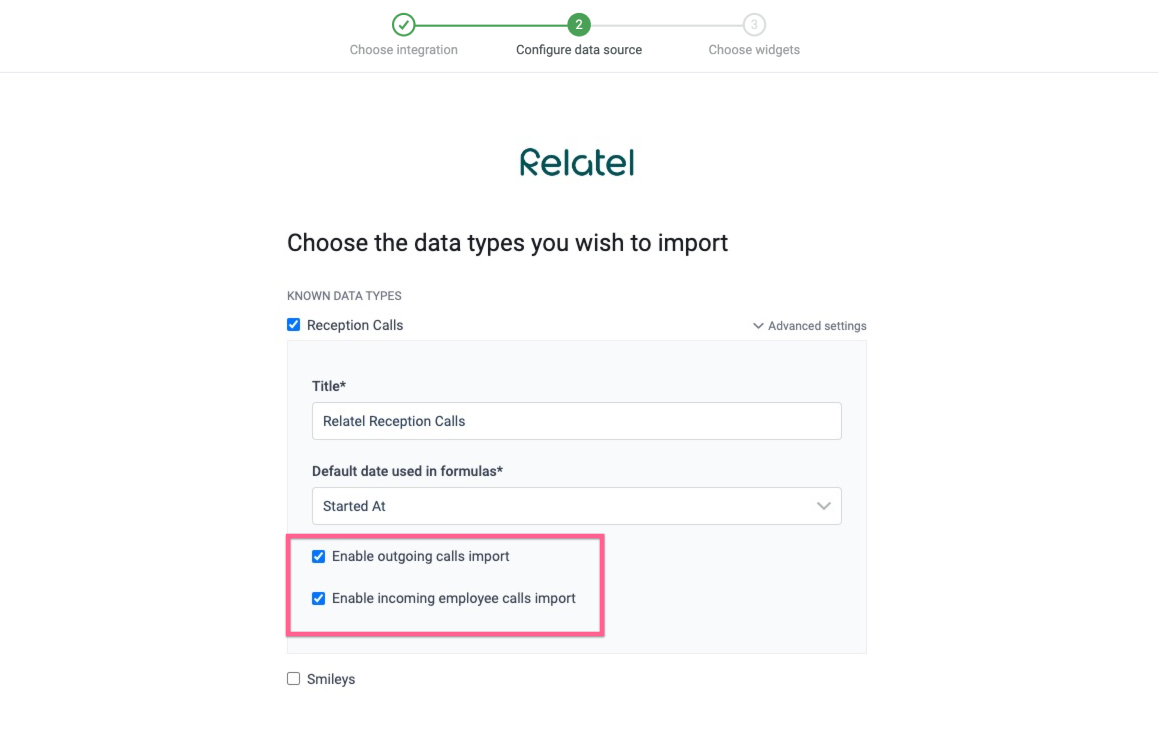
Select the data you want to import to Plecto and configure the data source settings.
- Note on Reception Calls. When configuring, tick both checkboxes (like in the image above). Plecto will then create one data source for one employee and display the employee's outgoing calls together with everyone's incoming calls. Read more below.
-
Click Next to choose how much data to import and how long you want to keep it in the data source.
-
Click Import to finish.
Reception Calls: Import incoming and outgoing calls
When you add Reception Calls, it's possible to configure an import of both the incoming and outgoing calls from Relatel.
However, it is not possible to have all outgoing and incoming calls gathered in a single data source due to limitations from Relatel that have been implemented to comply with the Danish telecommunications legislation.
Here's what you need to know
-
If you want to import only incoming calls, it's enough to select Reception Calls data and move on. Once added, the data source will contain all the information on incoming calls for all employees.
-
If you want to import both the incoming and outgoing calls, you need to create a new data source for each employee you plan to track. Plecto will then create a data source for the selected employee whose access token you used to connect data from Relatel. The data source will include information on all the incoming calls for all employees and information on outgoing calls for the configured employee.
Why so many data sources? Creating separate data sources is a solution that ensures compliance with the Danish telecommunications legislation. It also means that you will need to generate separate access tokens in Relatel for each employee you want to receive data.
Available data
Our integration with Relatel currently allows you to import the following data:
Update frequency: 1m
Supports custom fields? No
Supports webhooks? No
Supports automatic registration deletion? No
Supports relations? No
Update frequency: 2m
Default member field: answered_by
Default date field: started_at
Supports custom fields? No
Supports webhooks? No
Supports automatic registration deletion? No
Supports relations? No
Update frequency: 2m
Default member field: employee_id
Default date field: rated_at
Supports custom fields? No
Supports webhooks? No
Supports automatic registration deletion? No
Supports relations? No
This is a streaming data type.
Update frequency: Instant with webhooks and every 2m
Supports custom fields? No
Supports webhooks? Yes
Supports automatic registration deletion? No
Supports relations? No
Streaming data: Relatel Status
You can show live employee status on your table widgets on dashboards. The status comes from a streaming data source, so it will update every few seconds.
Add employee status for Relatel on your table widgets:
-
Make sure you have integrated a Relatel Status data source to Plecto.
-
In the data source settings, find a Dimension field and select Live Employee Status. Save the data source settings.
-
On your dashboard, add a new table widget or use an existing one. If you create a new widget, save it first, then edit again (after saving, a new option called Show employee status will appear).
-
Now, add a column and any of your Relatel formulas, for example, Number of Relatel Reception Calls. This will make some employees appear on your table widget and make it ready for streaming.
-
Finally, check the Show employee status box and save the widget. Plecto will start pulling data from your Relatel streaming data source. You will get two new columns: Status and Time in Status.
Note! Plecto will only update the streaming status of employees displayed in the table widget.
Tips for Relatel integration
-
You can choose to filter the information in your data source to only see the registrations for the outgoing calls you have imported. To filter, open the data source and click Filters in the top-right. From there, click on the Direction filter and type in "outgoing" to see the outgoing call registrations.
-
We suggest including the employee name you're importing outgoing calls for in the data source title. It will allow you to find your metrics easier when creating formulas. You can change the data source title in its settings.